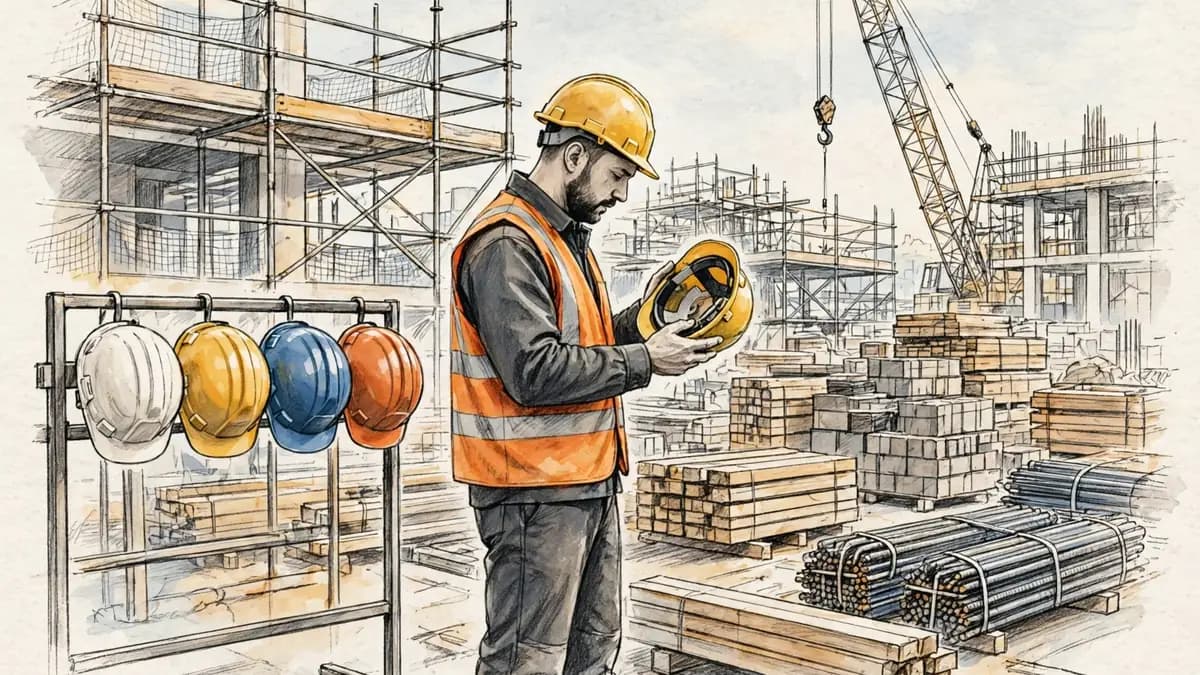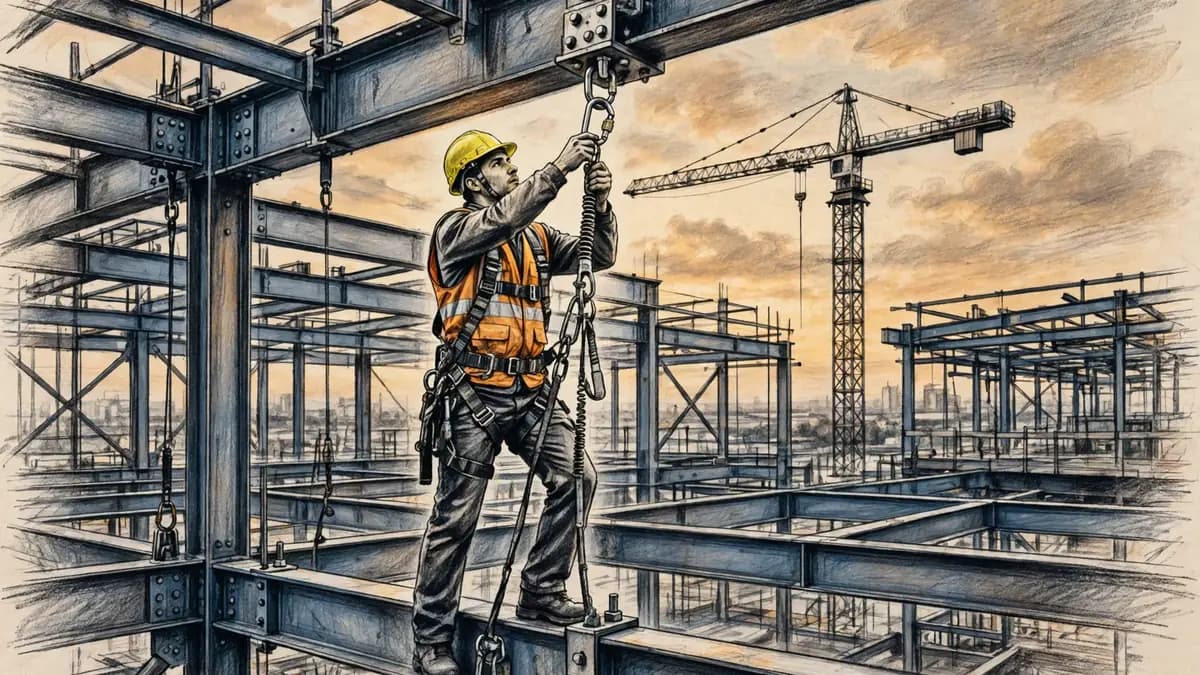
A fall protection harness is the body support of a personal fall arrest system. It is the part the worker wears. It is the part that decides whether a fall ends with a controlled stop or with a serious injury. A full-body harness spreads the force of a fall across the thighs, pelvis, waist, chest and shoulders. That spread is what keeps the worker upright during the arrest and able to breathe while waiting for rescue.
The harness only works as part of a system. It needs a rated anchorage and a connector, such as a shock-absorbing lanyard or a self-retracting lifeline, between the harness and the anchor. It also needs a rescue plan, because a worker hanging in a harness faces a second emergency of its own. Choosing the right type, inspecting it before every use, and wearing it correctly are three separate skills, and all three must be right at the same time.
What a fall protection harness does
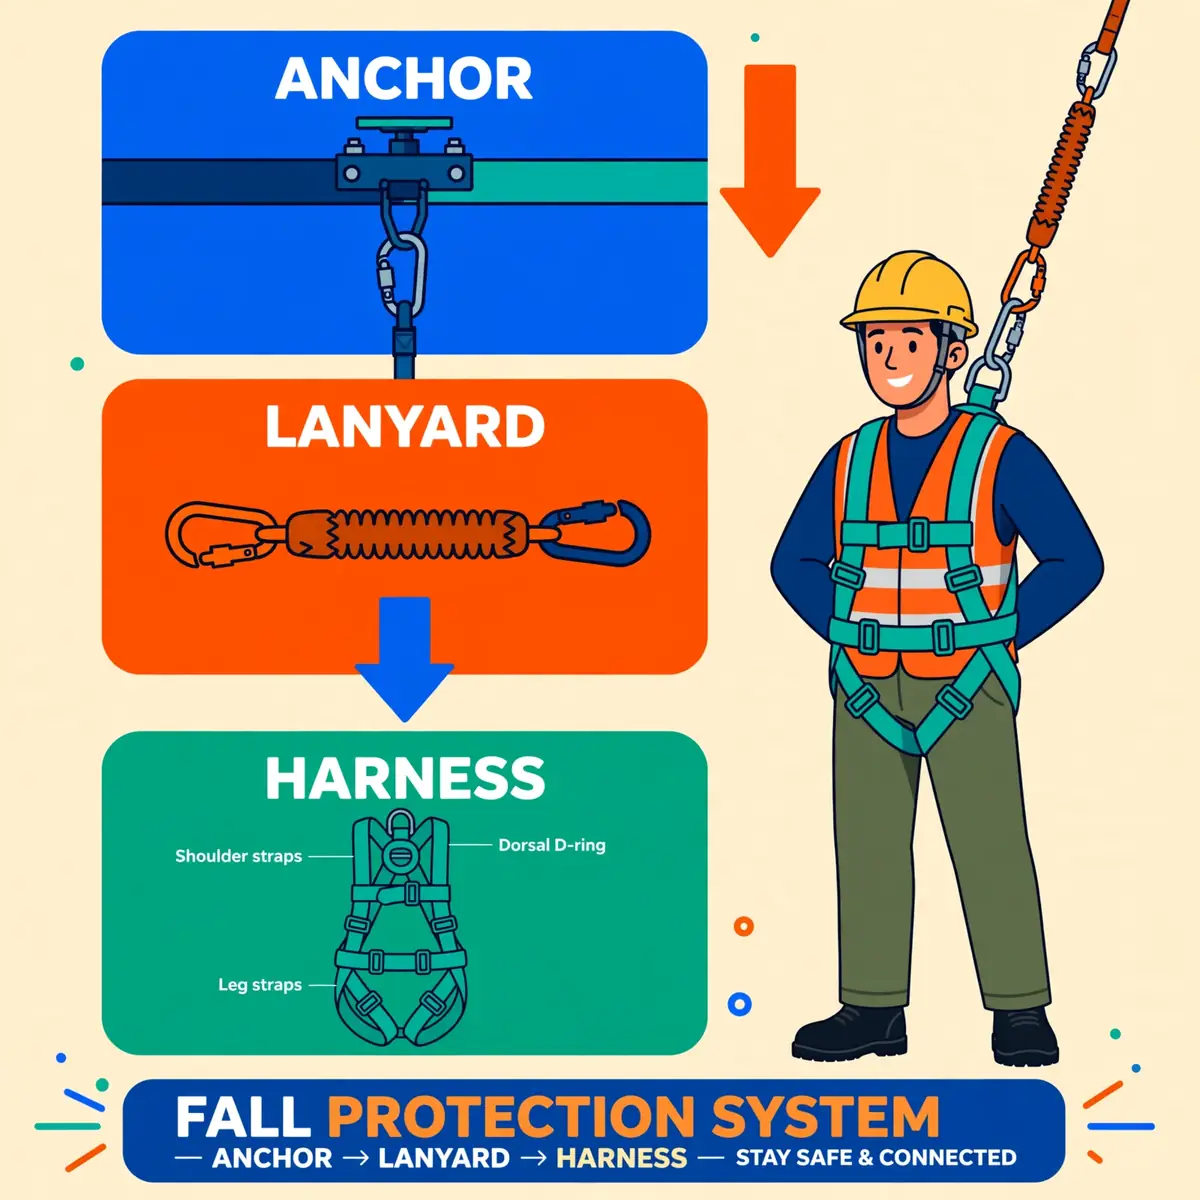
A harness does two jobs in a fall. First, it holds the body so the worker does not fall to the ground. Second, it spreads the arresting force over the parts of the body that can take it. The Occupational Safety and Health Administration (OSHA) defines a body harness as straps that secure about the worker. The straps distribute fall arrest forces over at least the thighs, pelvis, waist, chest and shoulders. That definition is the test every harness must pass.
The spread matters because a fall arrest loads the body violently. Under the US construction rule, a personal fall arrest system must limit the maximum arresting force on a worker in a harness to 1,800 pounds. A harness that concentrates that force on one part of the body, such as the waist, can cause internal injury even when the fall itself is stopped. The full-body design exists to keep the force spread and the worker upright.
How a harness spreads the force of a fall
When a fall is arrested, the connector pulls hard on the dorsal D-ring at the back of the harness. The shoulder straps take the load across the chest and shoulders, the leg straps take it across the thighs, and the sub-pelvic strap supports the seat. Each strap carries part of the force, so no single point takes the whole load. That is why a twisted strap or a loose leg strap is not a cosmetic fault: it changes where the force goes.
Staying upright matters as much as stopping the fall. The dorsal D-ring sits in the centre of the back, near shoulder level or above the head. That position keeps the worker upright during the arrest and in suspension afterwards. An upright worker can breathe, can deploy trauma straps, and can be rescued more easily. A worker who hangs head-down or folded over faces a far worse outcome, even when the equipment holds.
Why only a full-body harness arrests a fall
A body belt is a strap that secures about the waist. It was once the standard body support for work at height. It concentrates the arresting force on the waist, where the body cannot take it safely. The arresting force limit for a belt is only 900 pounds, against 1,800 pounds for a harness. That difference is why the law moved on, and why the belt is now limited to positioning work where no fall is arrested.
Since 1 January 1998, body belts have not been acceptable as part of a personal fall arrest system in US construction work. The ban is absolute for arrest, and it applies however new or strong the belt looks. A positioning belt, worn with a full-body harness, is a different item. It holds the worker in position while both hands work. It never takes an arrest load on its own. Positioning systems must be rigged so the worker cannot free fall more than 2 feet.
AlertA body belt must never be used to arrest a fall. This is because the force it concentrates on the waist can cause serious internal injury.
The parts of a harness
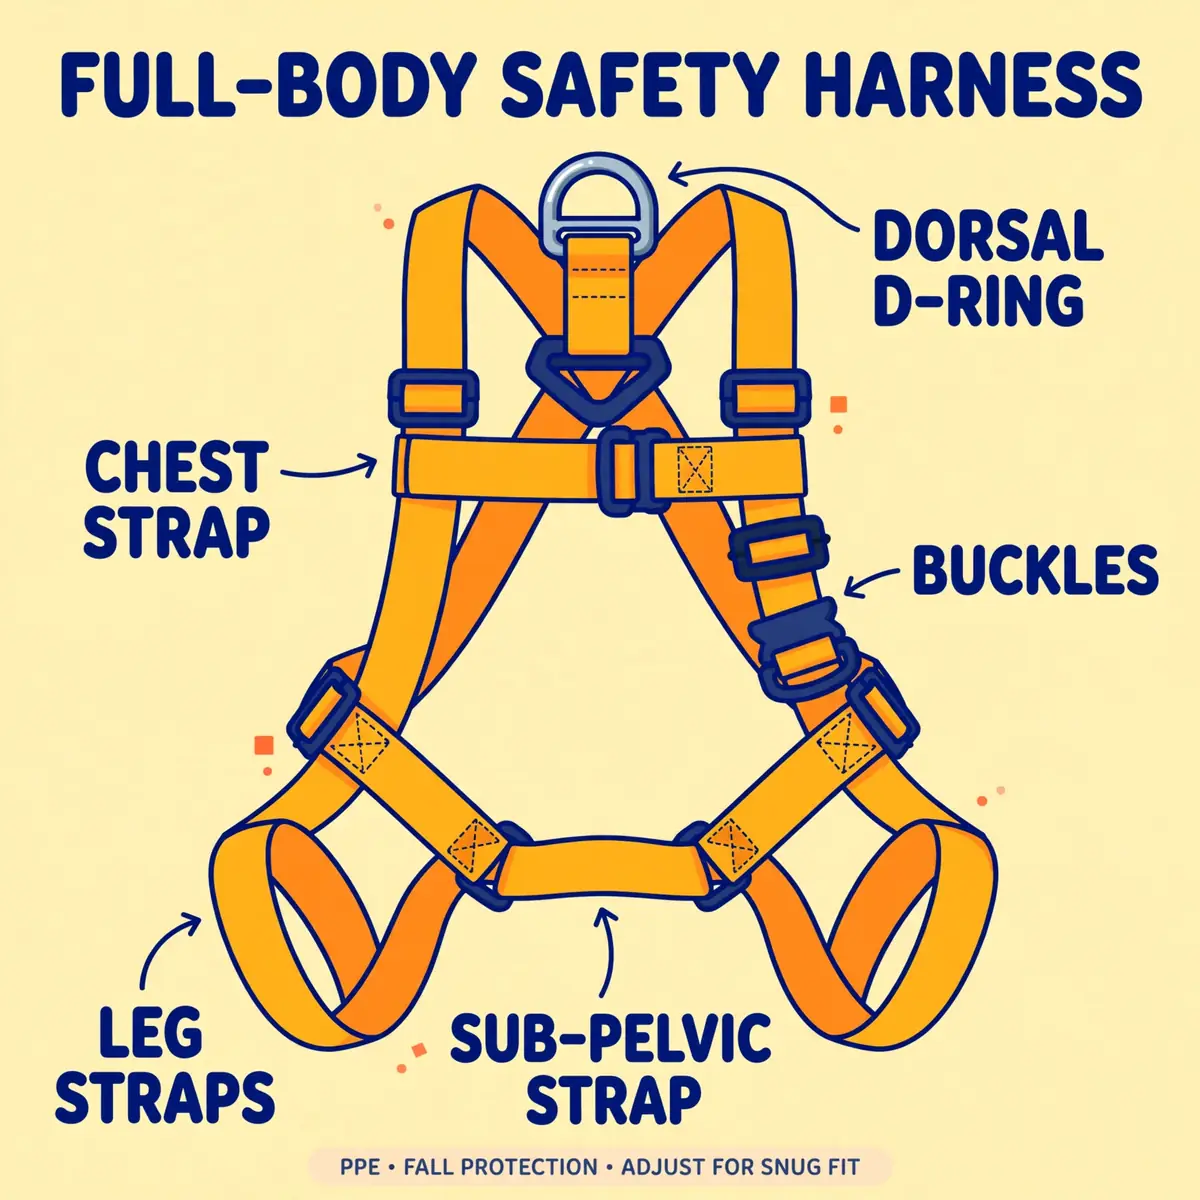
A harness looks simple at first glance: straps, buckles and a few metal rings. Each part has one job, and knowing the job is what makes inspection and fitting possible. The webbing carries the load, the D-rings connect the harness to the rest of the system, the buckles hold the adjustment. The straps that look secondary, such as the sub-pelvic strap, carry load at the moment that matters most.
Webbing is usually polyester or polyamide, chosen for strength and resistance to abrasion. It must lie flat against the body, with no twists. This is because a twisted strap loads unevenly and can cut into the wearer during an arrest. Buckles come in several forms: tongue buckles, quick-connect buckles that click shut, and mating buckles that join two halves. Every buckle must engage fully and hold under load, and every strap end must be stowed in its keeper.
D-rings: the attachment points
D-rings are the metal rings where the rest of the system connects, and each one has a defined use. The dorsal D-ring sits between the shoulder blades and is the primary fall arrest attachment point. The sternal D-ring sits on the chest and is used for ladder climbing systems, restraint, and rescue. It may serve for fall arrest only where free fall is tightly limited. Side D-rings at the hips are for work positioning only, never for fall arrest.
Shoulder D-rings sit at the top of the shoulder straps and are used for confined space retrieval, where a worker is lowered or raised through a vertical opening. Some harnesses also carry a front abdominal D-ring for suspension or rescue work. The rule for every D-ring is the same. Use it only for the job its marking and the manufacturer instructions allow. Never clip a connector to a D-ring that is already occupied.
| Attachment point | Position | Use |
|---|---|---|
| Dorsal D-ring | Centre of the back, between the shoulder blades | Fall arrest (primary point) |
| Sternal D-ring | Centre of the chest | Ladder climbing, restraint, rescue |
| Side D-rings | Hips | Work positioning only |
| Shoulder D-rings | Top of the shoulder straps | Confined space retrieval |
| Abdominal D-ring | Front, below the chest | Suspension and rescue |
The table above is a guide to the usual arrangement, not a substitute for the label on the harness in hand. Manufacturers mark each attachment point on the harness itself, often with the letter A beside points approved for fall arrest. Side D-rings carry no such marking for arrest, because they are not approved for it. When the label and a habit disagree, the label wins.
Straps, buckles and keepers
Shoulder straps run over the shoulders and carry the upper-body load. They join the chest strap, which keeps them from slipping off the shoulders during a fall. Leg straps run around the thighs and carry the lower-body load. The sub-pelvic strap runs beneath the seat to support the pelvis. Together the straps form a seat that holds the worker upright, which is why the fit of each one matters on its own.
Buckles hold the adjustment that the wearer sets. Quick-connect buckles must click audibly and stay shut until deliberately released. Tongue buckles must pass through the correct slot and sit flat, with no webbing folded over the bar. Keepers are the small loops that hold the loose ends of straps. A strap end left dangling can snag on equipment, unthread a buckle, or catch in moving parts, so every tail belongs in its keeper before work starts.
Padding, lanyard keepers and trauma straps
Padding on the shoulders, legs and waist spreads pressure during a long shift and during suspension after a fall. It is a comfort feature with a safety effect. A harness that chafes will be worn loose, adjusted badly, or quietly left off. Padding must not hide damage, so inspectors check the webbing beneath it as well as the padding itself. Some harnesses carry removable padding that can be lifted for inspection.
Lanyard keepers are small parking points, usually on the chest strap, where an idle connector can be stowed. A snaphook parked on a keeper stays out of the way and cannot snag. A snaphook must never be parked on the dorsal D-ring that will take the arrest load. This is because it can interfere with the connector or depress its own keeper. Trauma straps ride in a small pouch on the harness, ready for a suspended worker to deploy as standing loops.
Harness types: from 1-point to 5-point
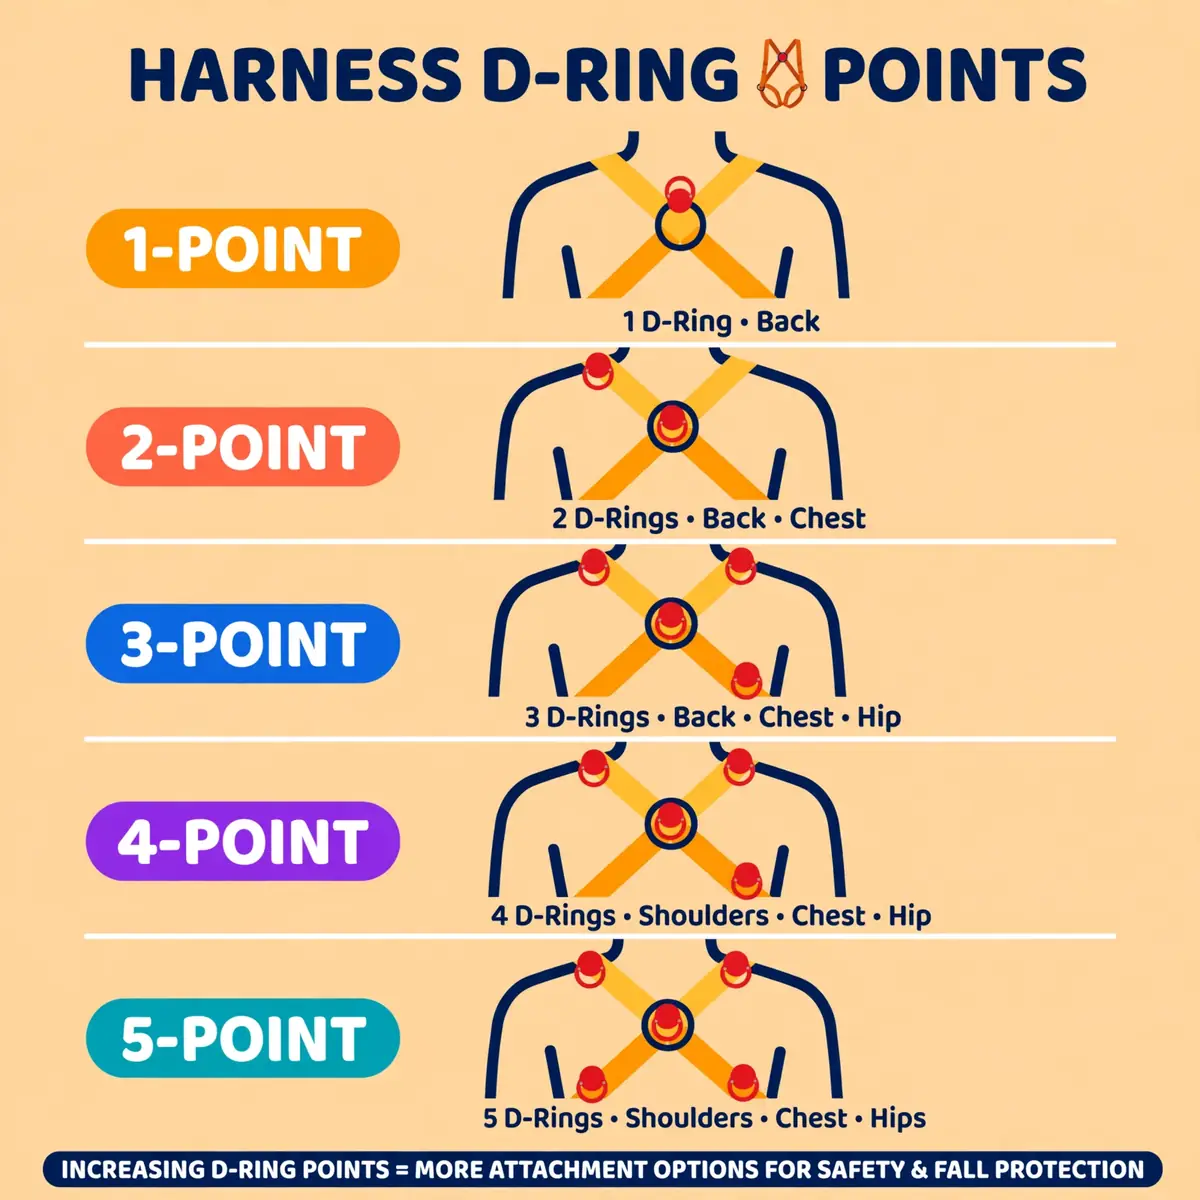
Harnesses are described by the number of attachment points they carry, from a single dorsal D-ring up to five points covering arrest, positioning, suspension and rescue. The number is not a quality ranking. A 1-point harness is the right tool for simple work with an overhead anchor, and a 5-point harness is wasted on that job. The right type is the one that matches the work, the anchor position, and the rescue plan.
European practice uses the same point system under the EN 361 standard for full-body harnesses. A 1-point harness carries one dorsal D-ring for fall arrest. A 2-point harness adds a sternal D-ring. A 3-point harness adds two side D-rings for work positioning. A 4-point or 5-point harness adds the sternal point and an abdominal point as well, covering fall arrest, restraint, positioning, suspension and rescue in one harness.
| Type | Attachment points | Best for |
|---|---|---|
| 1-point | Dorsal D-ring only | General work at height with an overhead anchor |
| 2-point | Dorsal and sternal D-rings | Fixed ladder climbing and rescue |
| 3-point | Dorsal and two side D-rings | Work positioning with both hands free |
| 4-point | Dorsal, sternal and two side D-rings | Positioning plus ladder climbing and rescue |
| 5-point | Four points plus an abdominal D-ring | Suspension, rope access and rescue work |
The table sets out the usual combinations, and real models vary. A rope access harness may carry a sternal point on top of a 3-point layout for technical work. A tower climbing harness may add tool loops and a seat. The point count tells the buyer what the harness can do. The label confirms which points are approved for fall arrest. A back-up fall arrest system is always required when the harness is used for positioning alone.
1-point and 2-point harnesses
A 1-point harness is the simplest full-body harness: a dorsal D-ring and nothing else. It is light, affordable, and quick to put on. That makes it the right choice for general maintenance and construction work where the anchor sits overhead and the worker moves little. Its limit is also its simplicity: it offers no positioning points and no rescue attachment, so any job that needs those must use a different harness.
A 2-point harness adds the sternal D-ring on the chest. That point serves fixed ladder climbing systems, where the worker connects to a guided rail or cable and climbs with the connector above the chest. It also serves rescue, where a rescuer connects to the front of the casualty. The dorsal D-ring stays the primary fall arrest point, and the sternal point is used for arrest only where free fall is tightly limited by the system design.
3-point, 4-point and 5-point harnesses
A 3-point harness adds two side D-rings at the hips. A positioning lanyard connects those rings to an anchor, supporting the worker in place with both hands free. This is the harness for work on vertical surfaces, such as formwork, facades and poles, where the worker must lean back and use both hands. A back-up fall arrest system is always required alongside the positioning system, because the side rings alone cannot arrest a fall.
Four-point and 5-point harnesses combine the earlier points into one harness. The 4-point model adds the sternal ring to the positioning layout, and the 5-point model adds an abdominal ring for suspension and rescue. These are the harnesses for rope access, tower work, and rescue teams, where one worker may climb, position, suspend and be rescued in the same shift. They cost more and weigh more, so they are the wrong choice for a simple overhead-anchor job.
Specialty harnesses for particular trades
Some jobs need a harness built for the environment, not just for the attachment points. Welding and hot-work harnesses use heat-resistant webbing and stitching, often aramid fibre, and shield the hardware from spatter. Arc-flash harnesses are tested to ASTM F887 for electrical work, with aramid webbing and protected or dielectric hardware. They must be paired with compatible arc-tested connectors.
Chemical and paint work calls for vinyl-coated harnesses, where the coating keeps material out of the webbing and allows washdown. Tower climbing harnesses add tool loops, a seat or bosun's chair, and extra padding for long suspensions. Confined space harnesses carry shoulder D-rings for retrieval. A worker can be raised through a manhole by a tripod and winch. The trade decides the harness, and the catalogue description is not enough. The label must confirm the standard and the rating.
TipChoose the harness by the job and the anchor position first, then check comfort. This is because a comfortable harness of the wrong type still fails the job.
Choosing the right harness for the job
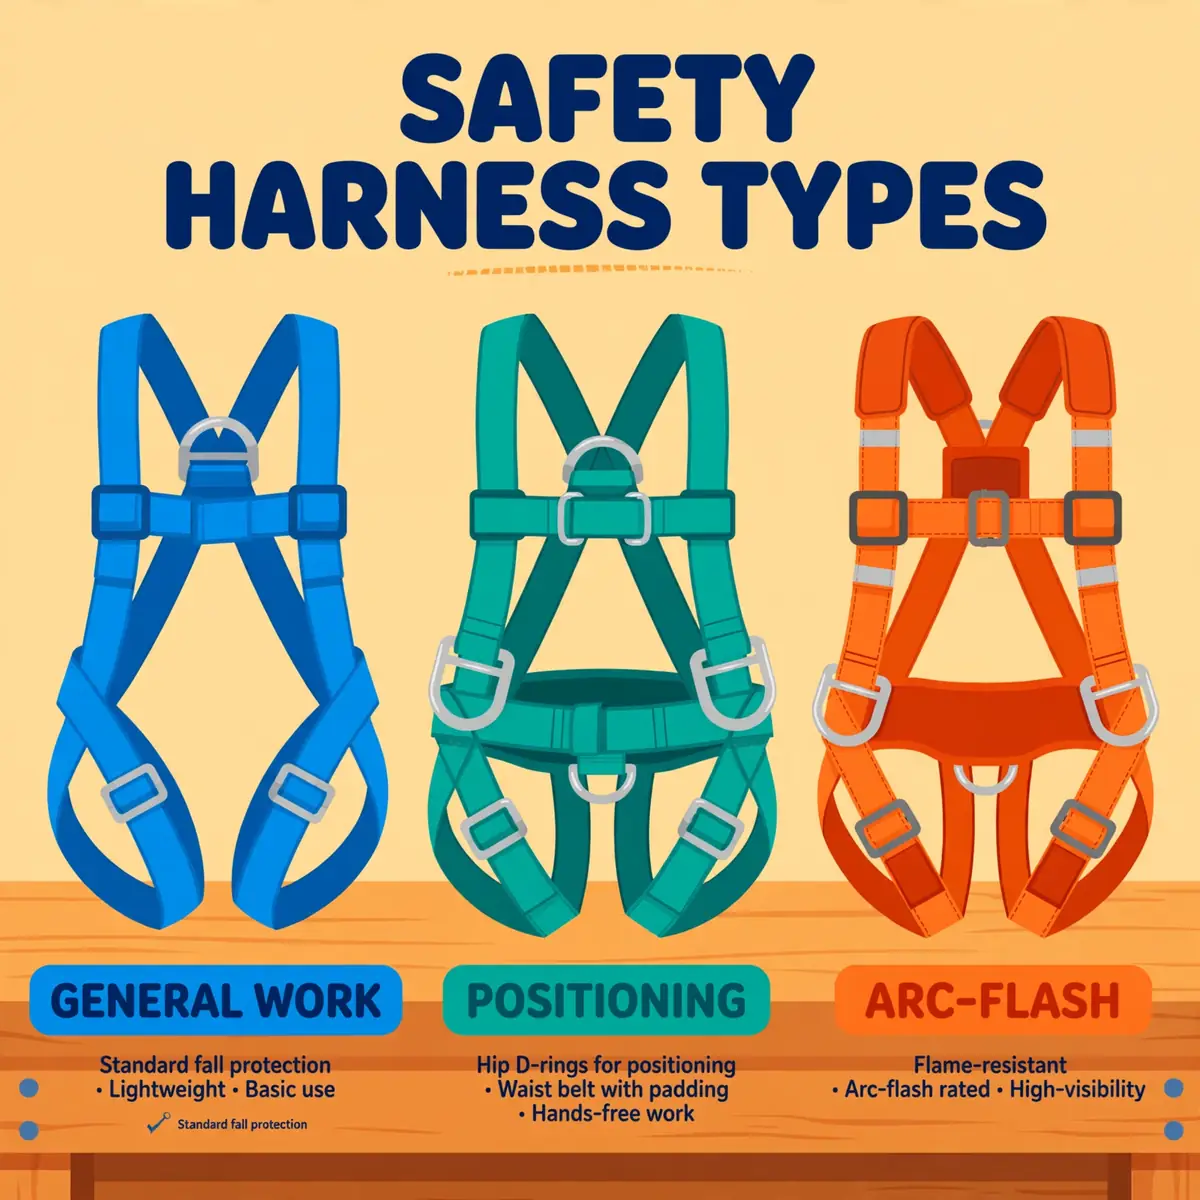
Choosing a harness starts with the work, not with the catalogue. The questions are simple: what will the worker do, where will the anchor sit, how will the worker move, and how will the worker be rescued. A risk assessment answers those questions for the job, and the harness follows from the answers. Buying first and planning second is how crews end up with harnesses that cannot do the job.
The anchor position shapes the choice more than any other factor. An overhead anchor suits a standard harness with a shock-absorbing lanyard. A foot-level anchor needs a self-retracting lifeline rated for that position, and the harness must suit the connector. A leading edge, where the line may load over steel or concrete, needs a device rated for edge use. The fall protection system is chosen as a whole, and the harness is one part of it.
Match the harness to the job
General construction and maintenance work suits a standard 1-point or 2-point harness with a dorsal D-ring and breathable padding. Pair it with an energy-absorbing lanyard where anchors are overhead, or with a self-retracting lifeline where clearance below is tight. Steel erection and tower work need a sternal D-ring for climb systems and hip D-rings for positioning. They also need a device rated for leading-edge work where the anchor may sit below the D-ring.
Utilities and electrical work need an arc-flash tested harness where arc exposure is a credible hazard. Welding needs heat-resistant webbing and stitching. Confined space work needs shoulder D-rings for vertical extraction plus the dorsal ring for arrest, compatible with the tripod and winch on site. Oil, gas and refinery work needs chemical-resistant webbing and corrosion-resistant hardware, with padding for extended wear. Each environment adds its own requirement, and the harness label must confirm it.
Sizing and weight capacity
A harness must fit the body it protects, and sizes vary by manufacturer. Measure chest, waist and height, then check the manufacturer's sizing chart for the model. This is because a medium from one maker is not a medium from another. Extended size ranges and women's fit models exist for a reason: a harness that cannot be adjusted to the wearer cannot be fitted correctly, however carefully the wearer tries.
Weight capacity is printed on the label and must cover the worker with clothing, tools and equipment. The US harness standard is ANSI/ASSP Z359.11-2021, from the American National Standards Institute and the American Society of Safety Professionals. It covers full-body harnesses for users within a capacity range of 130 to 310 pounds, or 59 to 140 kilograms.
Some manufacturers list a second, higher figure for OSHA use, up to 420 pounds, on the same label. The ANSI range is the range the standard tests to. A worker above 310 pounds needs a harness and a system rated for that weight, confirmed by the manufacturer.
Comfort and features worth paying for
Comfort is a safety feature, not a luxury. A harness that chafes, pinches, or digs in will be worn loose or left off, and a loose harness injures the worker in the fall it was bought for. Padding on the shoulders and legs, breathable webbing, and quick-connect buckles all make the harness easier to wear correctly for a full shift. The buckles can be fastened with gloves on. Lighter webbing and better adjustment reduce fatigue.
Features worth paying for depend on the job. Quick-connect buckles save time and reduce fitting errors. A built-in trauma strap pouch keeps suspension relief on the harness instead of in a bag. Tool loops and an integrated tool belt keep tools close on climbing work. High-visibility webbing helps supervisors spot a worker at height. None of these features replaces the right type or the right size, but they decide whether the right harness gets worn properly every day.
How to put on a harness, step by step
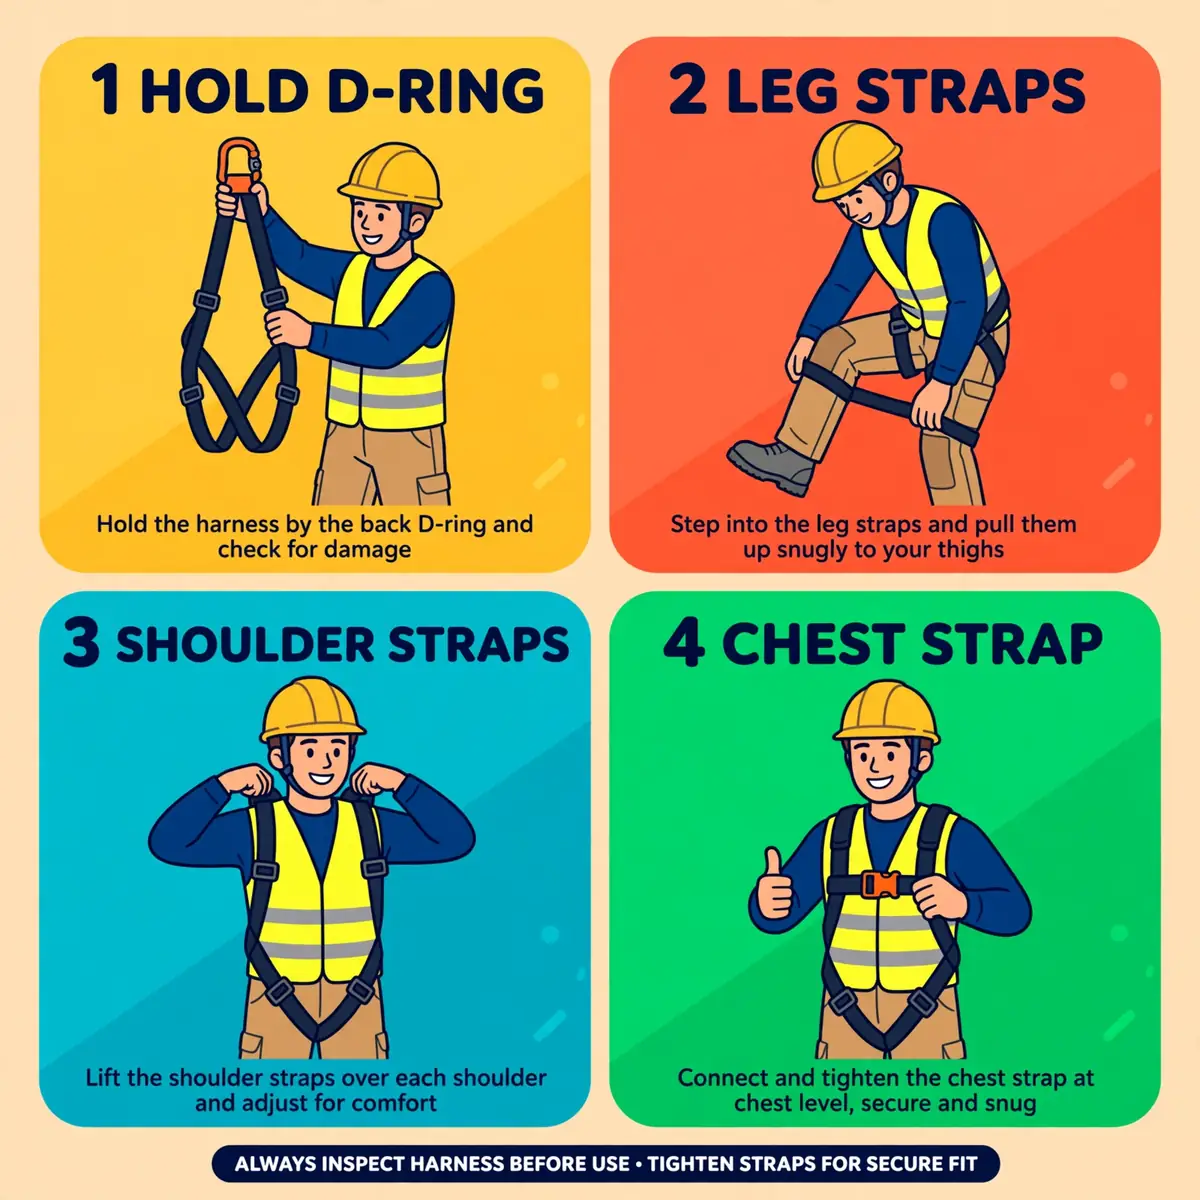
Putting on a harness is a procedure, not a habit, and the order matters. The steps below work for most full-body harnesses, but the manufacturer instructions for the model in hand always win. Practice the procedure away from the edge, on the ground, until it is smooth. A worker who fumbles with straps at height is a worker who will skip a step under pressure.
Start with the inspection, not with the straps. A harness must be inspected before every use. The inspection comes first because a defective harness must never be put on at all. Once the harness passes inspection, hold it by the dorsal D-ring and let it hang. The shoulder straps fall on one side and the leg straps on the other. That single move orients the harness and untangles most twists before they reach the body.
- Hold the harness by the dorsal D-ring with one finger and let it hang, so the straps untangle and the leg straps fall below the shoulder straps.
- Step into the leg straps one leg at a time, or lift the harness and pull the leg straps up, depending on the model and the manufacturer's instructions.
- Pull the shoulder straps over the shoulders, one at a time, and let the dorsal D-ring settle between the shoulder blades.
- Fasten the leg straps and adjust them until they are snug, with a flat hand fitting under the webbing but not a closed fist.
- Fasten the chest strap across the sternum and adjust it until it is snug enough to keep the shoulder straps from slipping off.
- Adjust the shoulder straps until the dorsal D-ring sits centred between the shoulder blades and the webbing lies flat everywhere.
- Stow every strap tail in its keepers, park any idle connector on a lanyard keeper, and check that no strap is twisted.
- Ask a colleague to check the fit from behind, especially the dorsal D-ring position, before connecting to the anchor.
The order in the list follows the usual manufacturer guidance: legs first, then shoulders, then chest last. Some models reverse the first two steps, putting the shoulder straps on before the leg straps. A few use a vest-style design that opens at the front. The principle does not change: work from the legs upward, finish with the chest strap, and check the D-ring last. If the chest strap will not meet, something is wrong. The D-ring may sit too low, a buckle may be wrong, or the legs may be in the wrong straps.
Before you start: read the label
Read the label before putting the harness on. The label carries the manufacturer, the model, the date of manufacture, the applicable standards, and the capacity range. It also carries the impact indicator on many models, a small stitched fold that rips open if the harness has taken a fall load. A missing or unreadable label is itself a reason to remove the harness from service. This is because the wearer cannot confirm what it is rated for or how old it is.
The label also tells the wearer which standards the harness meets. A harness marked to EN 361 is a full-body harness approved for fall arrest. A harness marked only to EN 358 is a positioning belt, not a fall arrest harness. It must never be used to arrest a fall. The same check applies to US models: the label should show the ANSI/ASSP Z359.11 marking and the capacity range. Buying and wearing are two different checks, and the label is where both are confirmed.
The hang check
Some manufacturers recommend a hang check: hanging in the harness for a short time, supported safely, to confirm that it distributes the load without painful pressure points. The check is done on the ground, with a controlled support, never at height and never as a test of the anchor. If the harness pinches, cuts in, or presses on the throat or groin, adjust it and try again. A harness that hurts in a short hang will hurt far more in a real suspension.
The hang check also confirms the size. A harness that cannot be adjusted to sit correctly during the check is the wrong size, and no amount of tightening will fix it. Workers who share harnesses across a crew must re-adjust every strap for their own body, every time. This is because a harness adjusted for someone else is a harness fitted for someone else. The check takes minutes, and it is the last chance to find a sizing problem before the work starts.
WarningNever connect to an anchor until the harness is fully fitted and checked. This is because a loose or twisted harness can injure the worker in the fall it was bought to stop.
The five-point fit check
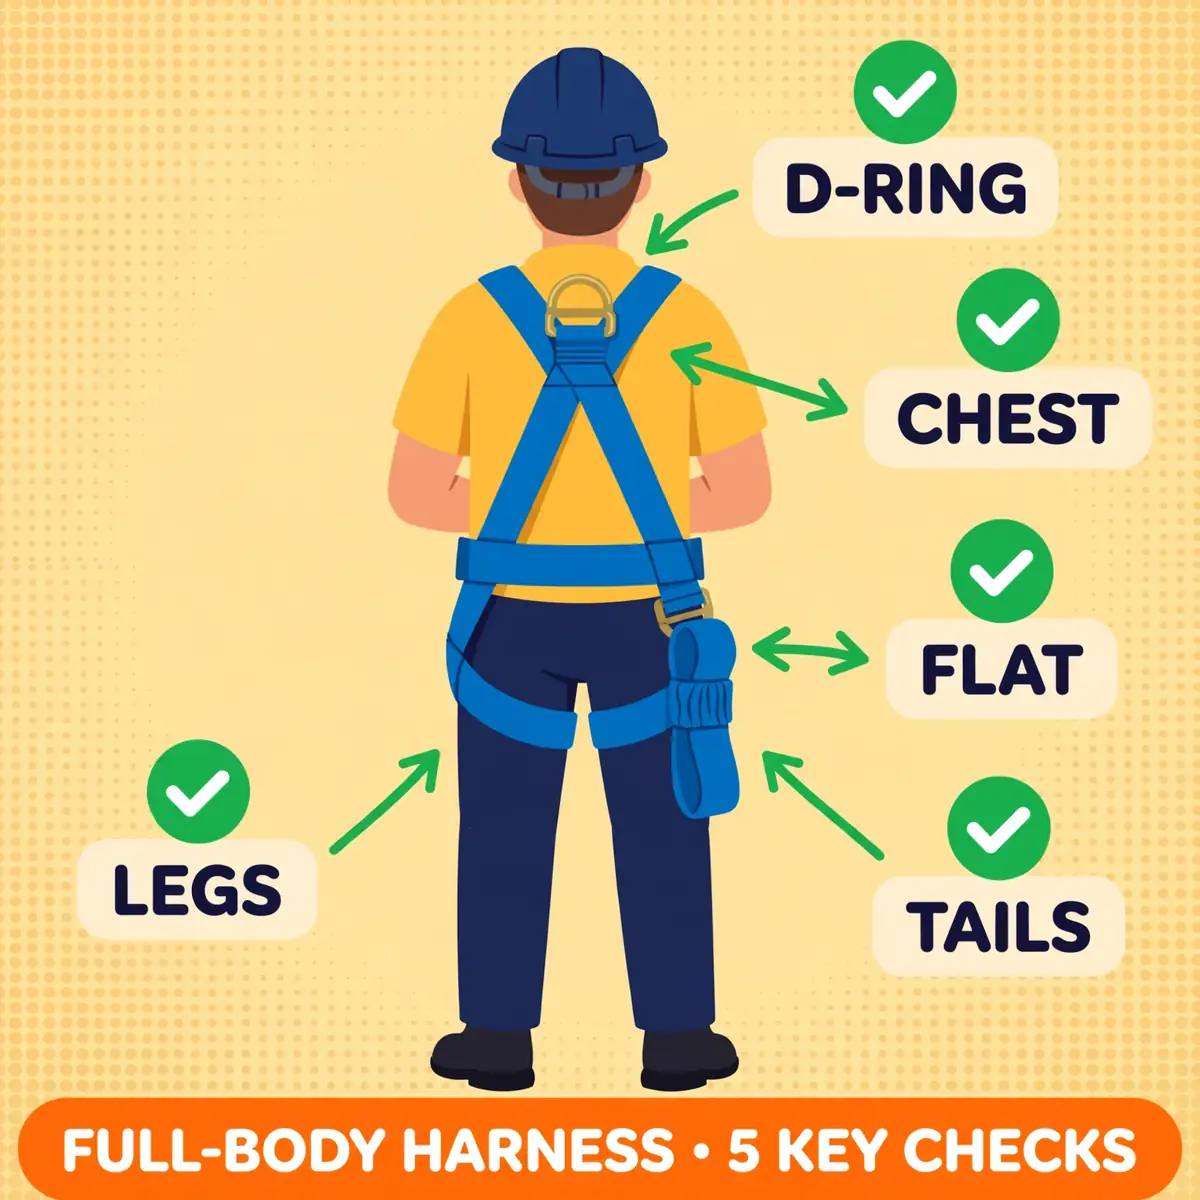
Fit is checked before every shift, with the same five points in the same order. The check takes a minute, and it catches the mistakes that turn a good harness into a hazard. Each point has a simple test that can be done without tools, and each test has a clear pass or fail. A harness that fails any point must be adjusted until it passes, or replaced with one that fits.
Fit starts with buying the right size and style, and no check can fix a harness that is fundamentally the wrong size. Workers must be able to adjust their own harness, and supervisors must check the fit rather than assuming it. A harness that fits one worker will not fit the next without a full re-adjustment, so the check belongs to every wearer, every shift.
- Dorsal D-ring: centred between the shoulder blades, reachable with a thumb over the shoulder.
- Chest strap: across the sternum, never at the throat, tight enough to hold the shoulder straps.
- Leg straps: snug to a flat hand, two fingers at most, never a fist.
- Webbing: flat everywhere, with no twists caught under a buckle.
- Tails: stowed in their keepers so nothing snags or unthreads.
The five points cover the whole harness in order, from the back to the chest to the legs to the webbing itself. The dorsal D-ring test is done by reaching a thumb over the shoulder: if the ring cannot be reached, it sits too low. The chest strap test is visual: it must cross the middle of the chest, not ride up to the throat or slip down to the ribs. The leg strap test is the flat-hand test, and it is the test most often failed.
What a bad fit feels like
A harness that is too loose feels comfortable on the ground and dangerous in a fall. Loose leg straps let the body slide until the sub-pelvic strap loads the groin, which can cause serious injury during the arrest. Loose shoulder straps let the harness shift, so the dorsal D-ring moves off centre and the arrest load lands unevenly. A loose chest strap lets the shoulder straps slip off entirely, which can let the worker slip out of the harness.
A harness that is too tight causes a different set of problems. Tight straps cut off circulation, restrict movement, and distract the worker, which leads to mistakes. Tight leg straps press on the arteries of the inner thighs, which matters most if the worker ends up suspended after a fall. The aim is snug but not tight: the straps should feel like a firm seat belt, holding the body without pinching or restricting breathing or movement.
Fit for different bodies
One size does not fit every worker, and the industry has been slow to admit it. Women's fit harnesses use different strap geometry and sizing, with a chest strap position and leg strap angles that suit a different body shape. Extended size ranges cover taller, shorter, and heavier workers who cannot be fitted in a standard medium or large. A harness that cannot be adjusted to the wearer is the wrong harness, whatever the label says about its size.
Clothing matters too. A harness fitted over a light shirt will not fit the same over winter layers, a thick jacket, or a tool belt. The fit check must be done in the clothing that will actually be worn for the work. Weight changes, injury, and pregnancy all change the fit, and the harness must be re-checked whenever the body or the clothing changes. The fit check is a daily habit, not a one-time fitting.
Inspection before every use
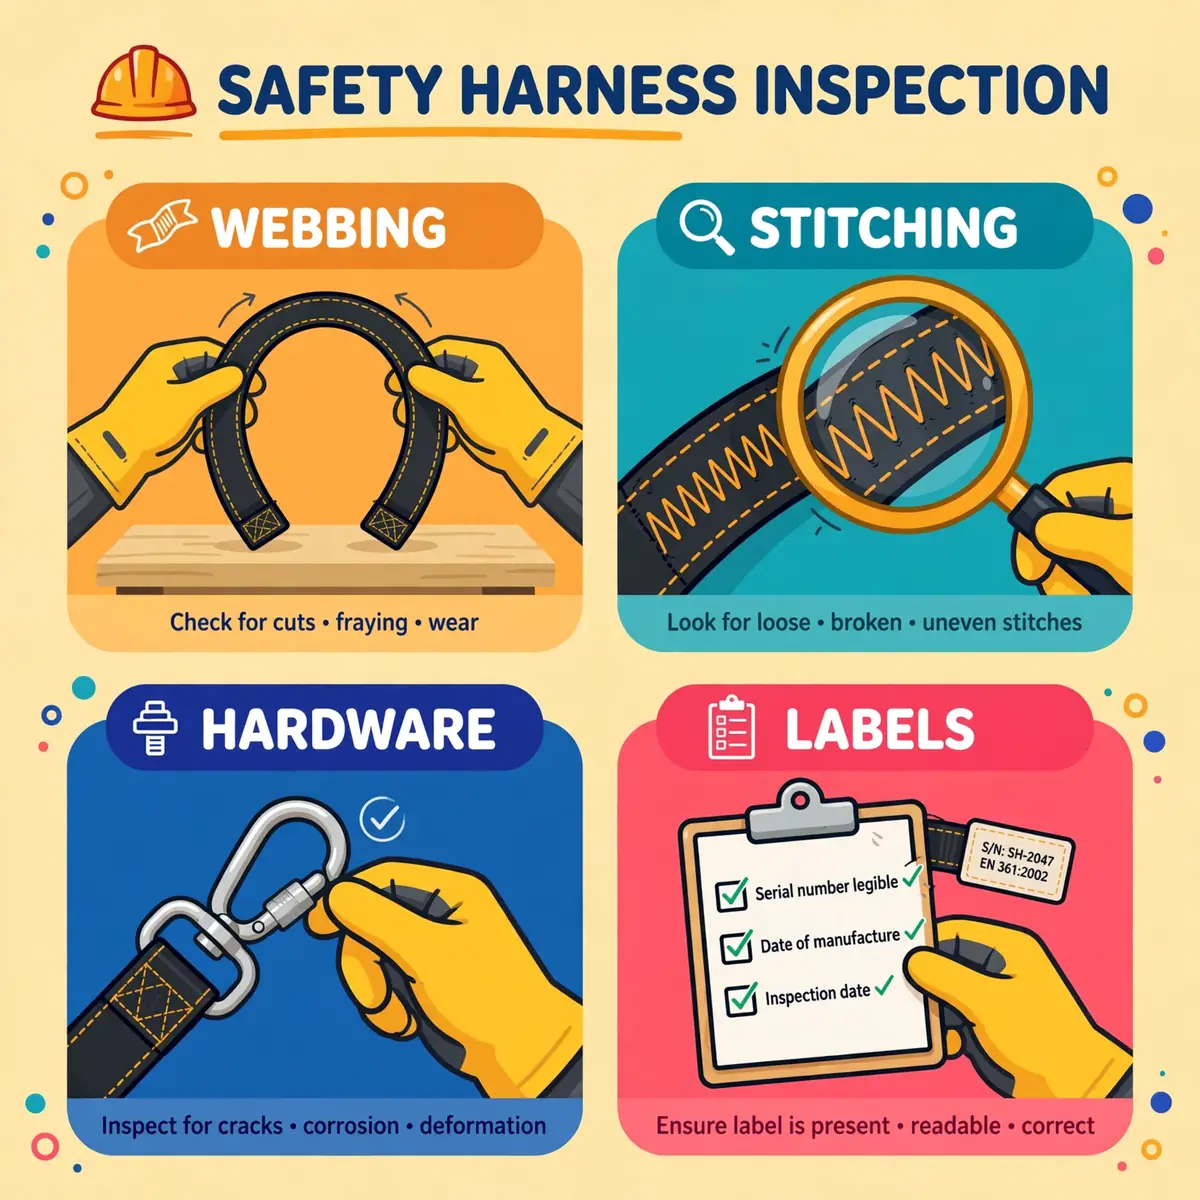
Fall protection equipment fails quietly. Webbing frays, stitching breaks, buckles crack, and absorber packs hide damage inside a neat cover. The law answers that risk with a simple rule. Under 29 CFR (Code of Federal Regulations) 1926.502(d)(21), personal fall arrest systems must be inspected prior to each use for wear, damage and other deterioration. Defective components must be removed from service. General industry carries the same duty under 29 CFR 1910.140, which requires personal fall protection equipment to be inspected before use.
The before-each-use inspection is the worker's own check, done every time the equipment is put on. It takes a few minutes. It is the inspection that catches most defects, because the worker handles every strap and buckle. The documented periodic inspection by a competent person comes on top of it, never instead of it. An annual inspection never replaces the daily one, and the law is explicit on that point.
Webbing and stitching
Start with the webbing, inch by inch, on both sides. Look for cuts, fraying, broken fibres, burns, chemical damage, and fading from sunlight. Bend short sections of webbing into a U-shape and look closely at the bend, because damage often shows there first. Check the parts hidden under buckles and keepers as well, since wear concentrates where webbing passes through hardware. Any cut, however small, is a reason to remove the harness from service.
Stitching must be complete, with no pulled, broken, or missing stitches, especially at the D-ring attachments and the absorber pack. Stitching carries the load at the joints, so a few missing stitches can cut the strength of the whole harness. Discolouration, stiffness, or a powdery feel in the webbing can signal chemical or UV damage that is invisible until the fibres fail. When in doubt, take the harness out of service and let a competent person decide.
Hardware: D-rings, buckles and snaphooks
Check every D-ring for cracks, distortion, corrosion, and sharp edges. A D-ring that is bent or cracked must never be used. This is because it can fail under the arrest load or cut the webbing it holds. Buckles must engage fully and hold: quick-connect buckles must click shut and stay shut, tongue buckles must sit flat in the right slot, and mating buckles must join cleanly. A buckle that slips, sticks, or fails to lock is defective, however new it looks.
Snaphooks and carabiners must close and lock fully, with no bent gates, worn keepers, or corrosion. Only locking snaphooks are permitted. The gate must be self-closing and self-locking, staying closed and locked until deliberately unlocked and opened. A snaphook that does not lock is defective. Check the impact indicator as well: if the stitched fold has ripped open or stretched, the harness has taken a fall load and must be removed from service.
Labels and the inspection checklist
Finish with the labels. Every harness must carry legible labels showing the manufacturer, model, date of manufacture, and applicable standards. A missing or unreadable label is itself a reason to remove the item from service. This is because the user cannot confirm what it is rated for or how old it is. The label also carries the capacity range, which must cover the wearer with clothing, tools and equipment.
A written checklist turns the inspection from a habit into a record. Build it from the manufacturer instructions for the model, and require each worker to work through it before every use. The checklist below covers the points the law and the standards require, in the order the inspection runs.
- Labels: present and legible, showing manufacturer, model, date and standards.
- Webbing: no cuts, fraying, burns, chemical stains or sun fading on either side.
- Stitching: complete at every attachment, with no pulled or missing stitches.
- D-rings and buckles: no cracks, distortion, corrosion or sharp edges; buckles engage and hold.
- Snaphooks: locking type, closing and locking fully, with no bent gates.
- Impact indicator: unbroken, with no sign that the harness has taken a fall load.
- Keepers and padding: keepers intact, padding in place, webbing beneath it checked.
- Trauma straps: pouch present, straps inside, attachment checked.
WarningAny harness that fails one point on the checklist is out of service. Tag it and remove it from the work area before it can be picked up by mistake.
Detailed inspection and inspection records
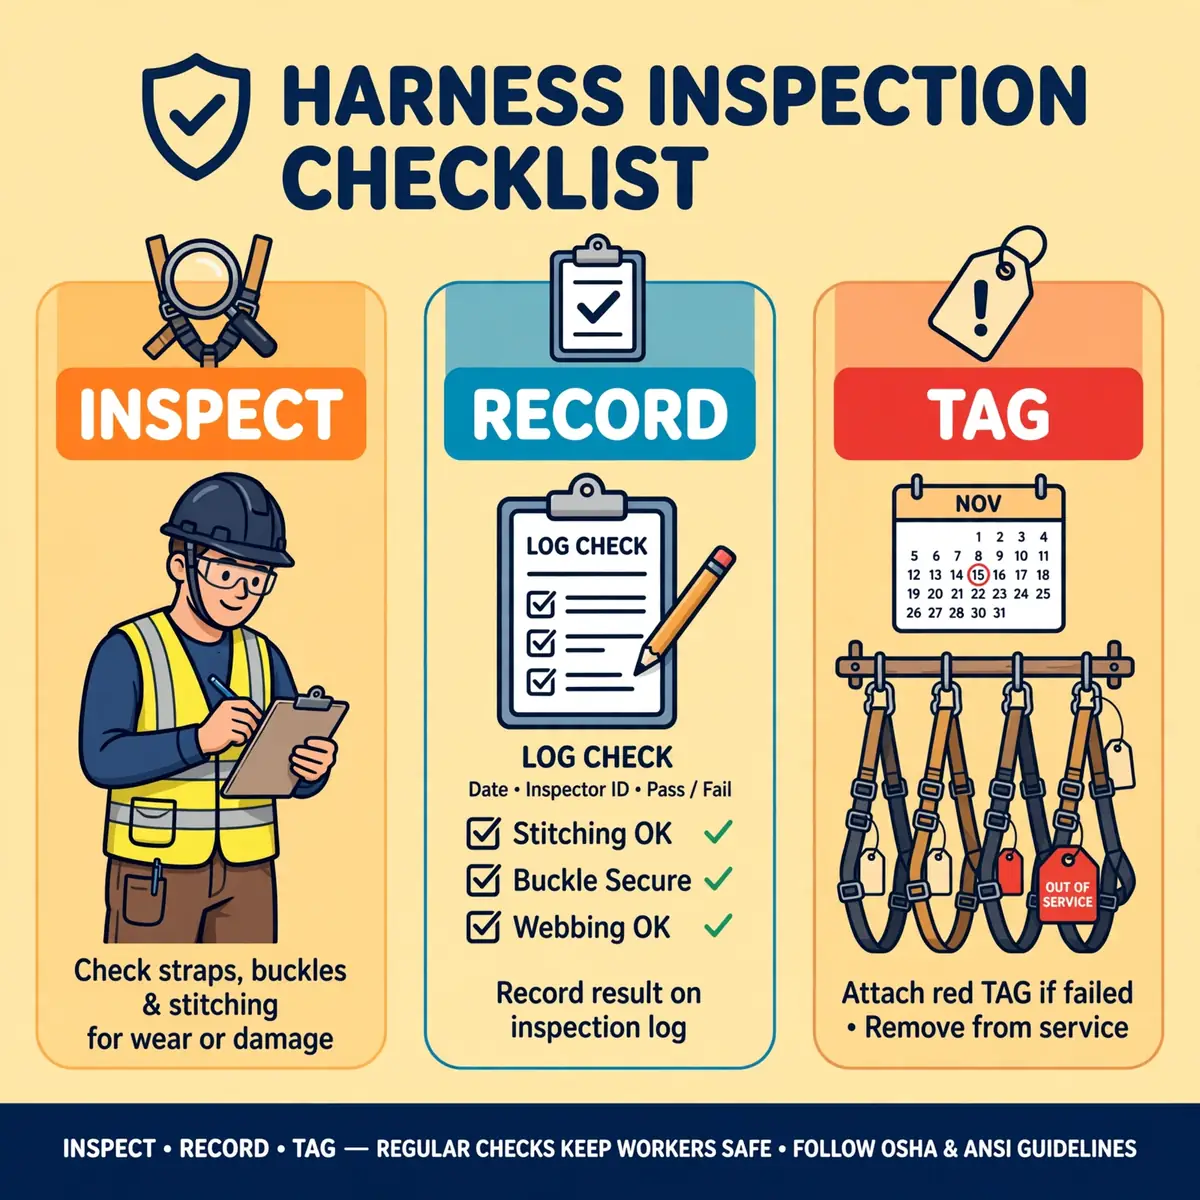
The pre-use check is the first layer of inspection, not the only one. Above it sits the detailed inspection: a thorough, documented examination by a competent person, carried out on a schedule set by the manufacturer and by the conditions of use. The detailed inspection looks deeper than the daily check, covers the whole harness including hidden parts, and produces a record that proves the inspection happened.
The two layers serve different purposes. The daily check catches damage from the last shift. The detailed inspection catches slow deterioration, such as UV damage, chemical attack, and wear inside buckles, that a quick check can miss. Confusing the two is the most common error in the subject, and it is the error that lets a slowly failing harness stay in service for months.
Who inspects, and how often
A competent person carries out the detailed inspection. OSHA defines a competent person as someone capable of identifying existing and predictable hazards in a personal fall protection system or any component of it. That person is also authorised to take prompt corrective action. That definition sets two tests: the knowledge to spot the hazard, and the authority to act on it. A worker who can see the damage but cannot remove the harness from service is not the competent person for the job.
How often the detailed inspection happens depends on the manufacturer instructions and the conditions of use. In the UK, the Health and Safety Executive (HSE) leaflet INDG367 recommends a regime drawn up by a competent person, covering pre-use checks, detailed inspection and interim inspection where needed. The British Standard behind it calls for components to be examined at least every 12 months. Many UK employers run detailed inspections every six months under BS 8437, or every three months in arduous conditions such as demolition, scaffolding and steel erection.
In the US, the manufacturer instructions set the interval, and many sites document at least an annual check, with shorter intervals where conditions are harsh. The interval is not a guess. It is written in the inspection regime, applied to each harness by its unique identification, and monitored so that inspections actually happen on schedule. A regime that exists on paper and never runs is worse than no regime, because it creates a false sense of safety.
What the detailed inspection covers
The detailed inspection repeats the pre-use check in greater depth and adds what the daily check cannot do. The inspector removes padding where it can be lifted and checks webbing under every buckle and keeper. The inspector also flexes webbing along its full length and tests every buckle and snaphook under hand load. The inspector checks the stitching with a close look at every load-bearing joint. The inspector also checks the hardware for wear that only shows when parts are moved through their full range.
The inspector also checks the history of the harness: its date of manufacture, its service life, and whether it has ever arrested a fall or taken an impact load. A harness that has arrested a fall must be removed from service at once. It may be used again only after a competent person inspects it and finds it undamaged and suitable for reuse. The same rule applies to any component subjected to impact loading, however minor the impact looks.
Records, tagging and interim inspections
Every detailed inspection produces a record: the harness identification, the date, the inspector, the result, and any action taken. The record lets the employer prove the regime runs, spot a harness that keeps failing. Show an inspector that the equipment is managed. Many sites tag each harness with its next inspection date, so a worker can see at a glance whether the harness is in date before putting it on.
Interim inspections sit between the scheduled detailed inspections. They happen when a risk assessment identifies conditions that could cause significant deterioration before the next scheduled inspection, such as chemical exposure, heavy use, or a harsh environment. A harness that fails any inspection, at any level, is tagged as defective and physically removed from the work area, so it cannot drift back into use by mistake.
Care, storage and retirement
A harness is lifesaving equipment, and it deteriorates even when it is not being used. Sunlight, chemicals, damp, and sharp edges all attack webbing and hardware. The damage is often invisible until the fibres fail. Care and storage are therefore part of the inspection regime, not an afterthought. The manufacturer instructions for the model are the authority on both.
Retirement follows the same authority. There is no universal expiry date for a harness. The manual sets the service life and the retirement criteria for each model. Many manufacturers state a maximum service life of about 10 years from manufacture, but that figure varies by maker and by model. The date on the label and the condition of the harness decide together, and the manual decides when they disagree.
Cleaning a harness
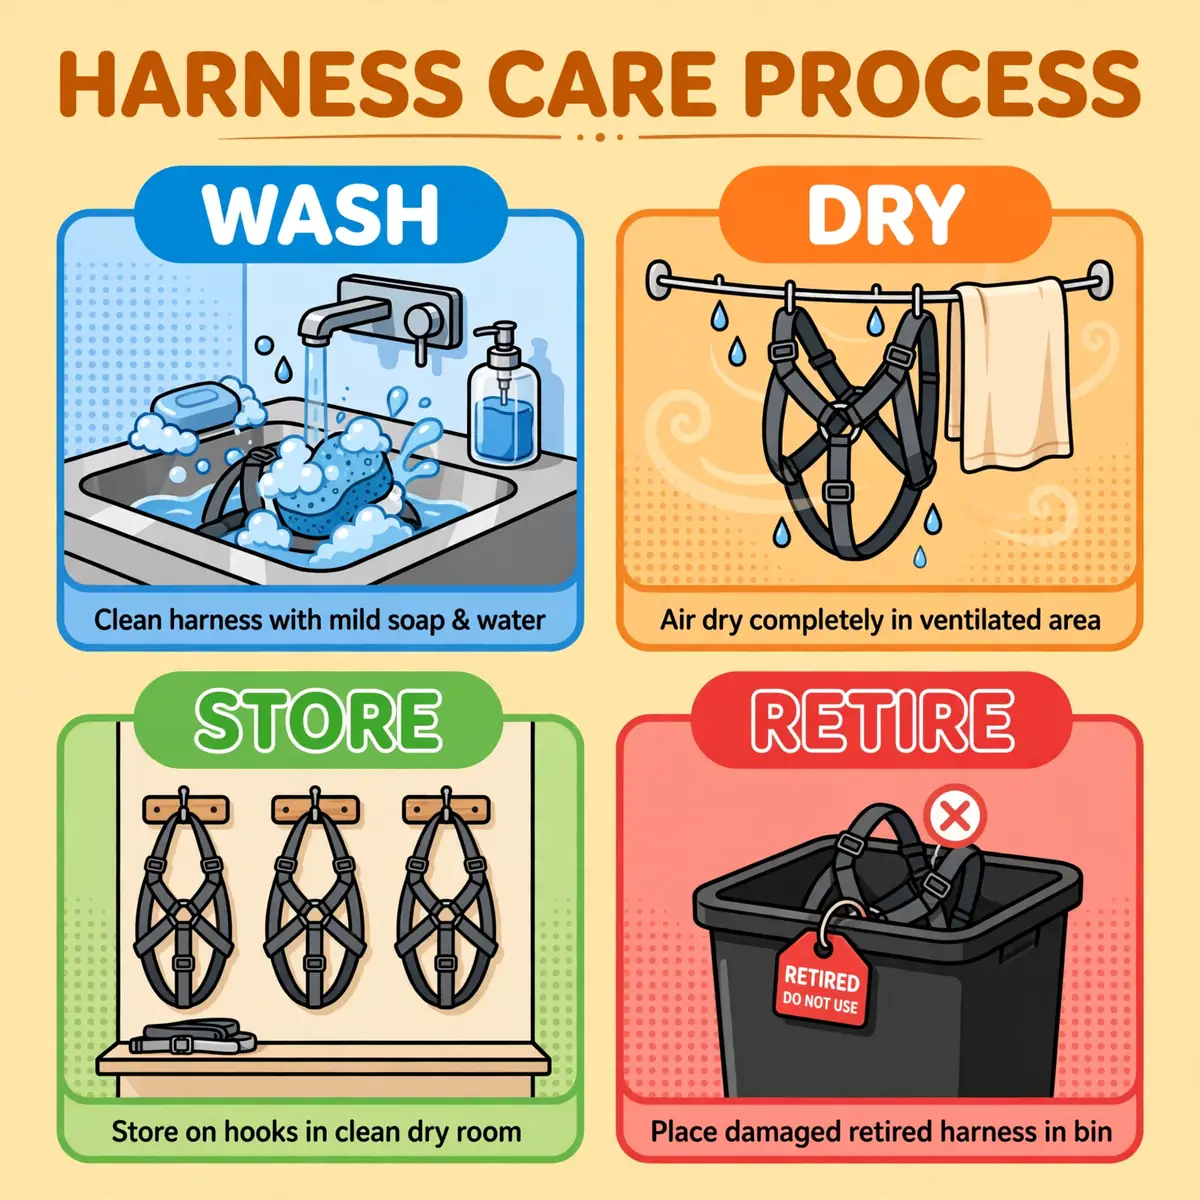
Clean webbing with mild soap and lukewarm water, then rinse thoroughly and let it dry away from direct heat. Wash by hand where possible, and never use solvents, bleach, or abrasive cleaners on webbing. This is because chemical damage is often invisible until the fibres fail. Some manufacturers allow a gentle machine wash on a delicate synthetic cycle, inside a cloth bag, with no spin. The manual for the model states whether that is allowed.
Dry the harness naturally, hanging in moving air away from radiators, heaters, and direct sunlight. Never use a tumble dryer or a heat source to speed drying, because heat damages synthetic fibres. Clean the hardware separately, removing dirt and grit from buckles and snaphooks so the gates move freely. A buckle full of grit can fail to lock, and the failure will not show until the harness is needed.
Storing a harness
Store harnesses in a cool, dry place away from sunlight, chemicals, and sharp edges. Hang them on pegs or hooks, or coil them loosely, never knotted or crushed under other equipment. A harness left in the back of a van, on a damp floor, or under a pile of tools will deteriorate faster than one stored properly. The damage will not be obvious at the next pre-use check.
Keep harnesses away from chemicals, paints, solvents, and fuels, including their fumes. A harness stored beside an open container can absorb vapours that weaken the webbing without leaving a visible mark. Keep them away from rodents and insects where that is a risk. Keep them out of direct sunlight as well. Ultraviolet light is one of the main causes of webbing degradation, and a harness left on a sunny windowsill ages faster than one in a cupboard.
When to retire a harness
Remove a harness from service when any of these apply:
- It fails any inspection point.
- It has arrested a fall.
- Its labels are unreadable.
- The manufacturer states its service life has ended.
Retire it when the webbing shows cuts, heavy fraying, burns, chemical damage, or severe fading. Retire it when stitching is pulled or missing at a load-bearing joint, when hardware is cracked, distorted or corroded, or when a buckle or snaphook no longer locks.
Retired gear must be marked clearly and kept apart from gear in service, so it cannot drift back into use. The safest practice is to cut the webbing of a retired harness before disposal, so no one can pick it up and wear it. Record the retirement in the inspection log, with the reason and the date, so the history of the harness is complete and the replacement can be tracked.
AlertA harness that has arrested a fall must never return to service on a visual check alone. This is because internal damage can hide behind intact webbing.
Suspension trauma and trauma straps
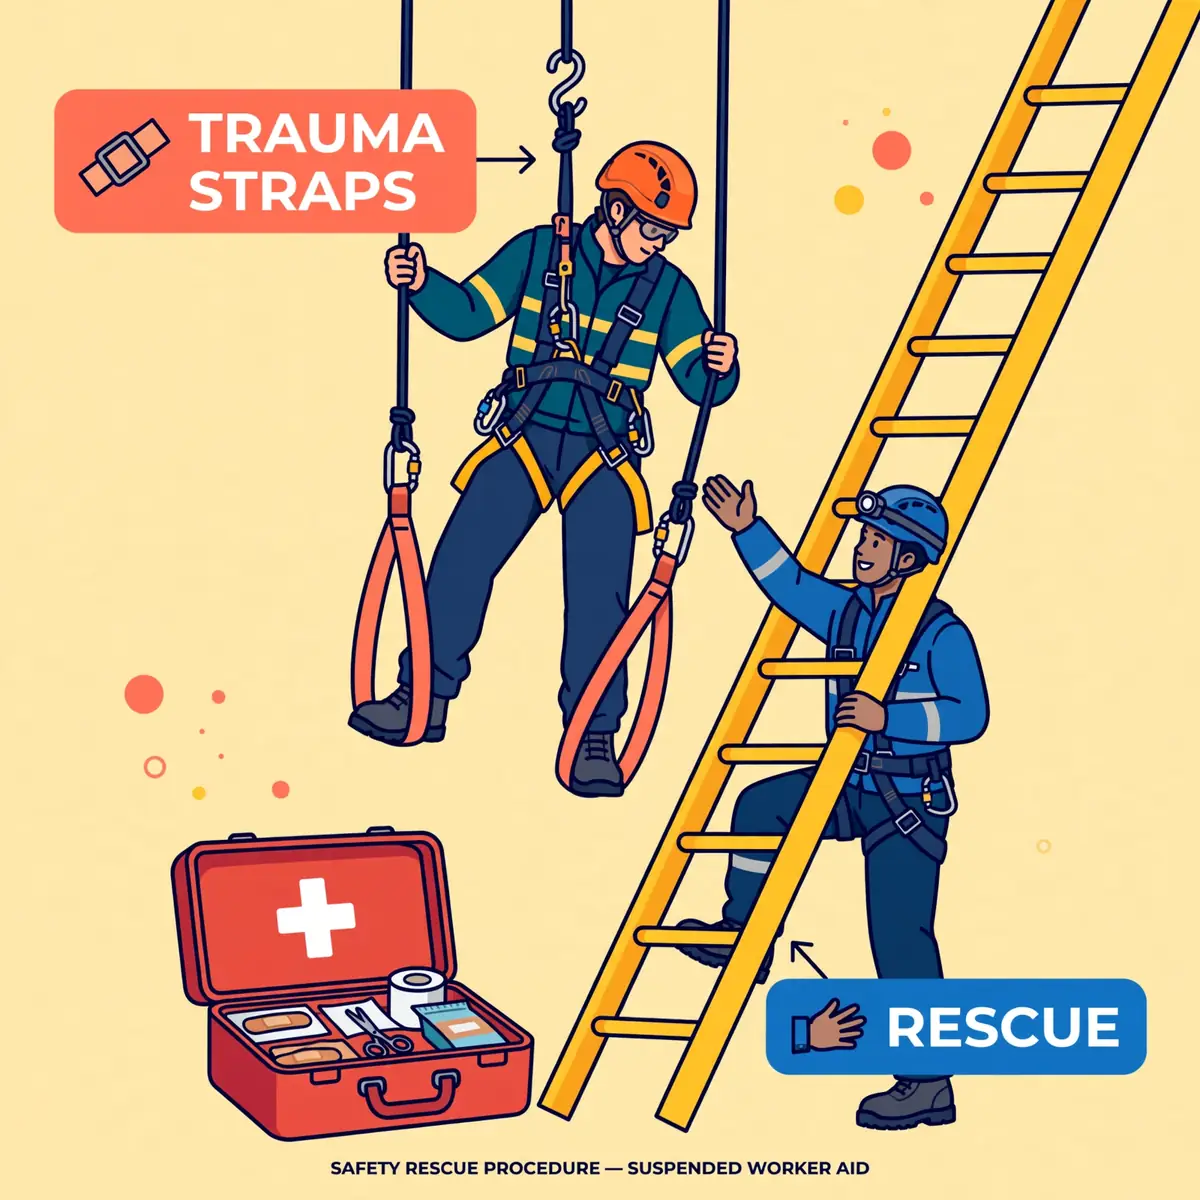
Arresting a fall is only half the job. A worker who hangs motionless in a harness faces a second emergency: blood pools in the legs, circulation to the brain falls. The worker can lose consciousness. OSHA's bulletin on suspension trauma and orthostatic intolerance warns that this can develop while the worker waits. The bulletin cites research showing that suspension in a fall arrest device can lead to unconsciousness and then death in less than 30 minutes.
The risk starts as soon as the worker hangs still, and it varies with the individual, the harness, and whether the worker is injured or unconscious. That is why the rescue plan must exist before anyone ties off, and why the plan must name who rescues, with what equipment, and how long each step takes. The fall protection system is incomplete without it, because the harness can hold the worker while the wait itself causes the harm.
What happens during suspension
Suspension trauma, also called orthostatic intolerance or harness hang syndrome, begins when a motionless worker hangs upright in a harness. The leg muscles stop pumping blood back to the heart, blood pools in the lower body, and the brain receives less oxygen. Symptoms include nausea, a drop in blood pressure, and loss of consciousness. The leg straps add to the problem by pressing on the arteries of the inner thighs, which restricts blood flow further.
The sub-pelvic strap and the fit of the leg straps affect how quickly the problem develops, which is another reason the fit check matters. A well-fitted harness with a sub-pelvic strap that supports the seat spreads the load and slows the pooling. A badly fitted harness with loose leg straps lets the body slide and loads the groin, which speeds it up. Fit is therefore part of the rescue picture, not only part of the arrest picture.
Trauma straps: buying time
Trauma relief straps buy time. They ride on the harness in a pouch, and a suspended worker deploys them into loops to stand in, keeping the legs pumping blood instead of letting it pool. Standing in the loops lets the leg muscles work, which pushes blood back to the heart and keeps the worker conscious until rescue arrives. The straps are not rescue: they are the bridge that keeps a worker conscious until the rescue that was planned actually arrives.
Compatibility is not universal, so the attachment method must be checked against the harness manufacturer's instructions. Some straps attach to the harness with dedicated loops, others clip to the D-rings, and some harnesses carry them built in. Workers must practise deploying the straps on the ground. This is because a suspended worker who has never used them will struggle to find the pouch and deploy the loops under stress. The practice belongs in training, not in the emergency.
After rescue: what follows
Every rescued worker needs first aid and medical assessment, even when the worker feels fine. A worker who has hung in a harness can develop problems after being brought down, as pooled blood returns to circulation. The rescue plan must state what first aid follows the rescue and who provides it. The worker must not be left alone after the rescue, and the incident must be recorded with the equipment involved.
The harness and connector used in the fall must be removed from service at once. The incident must be reported through the normal channels. The rescue itself should be reviewed afterwards: how long it took, whether the equipment worked, and what would change next time. A plan that is never tested or reviewed is a guess, and the next fall will test it for real.
Law, standards and training
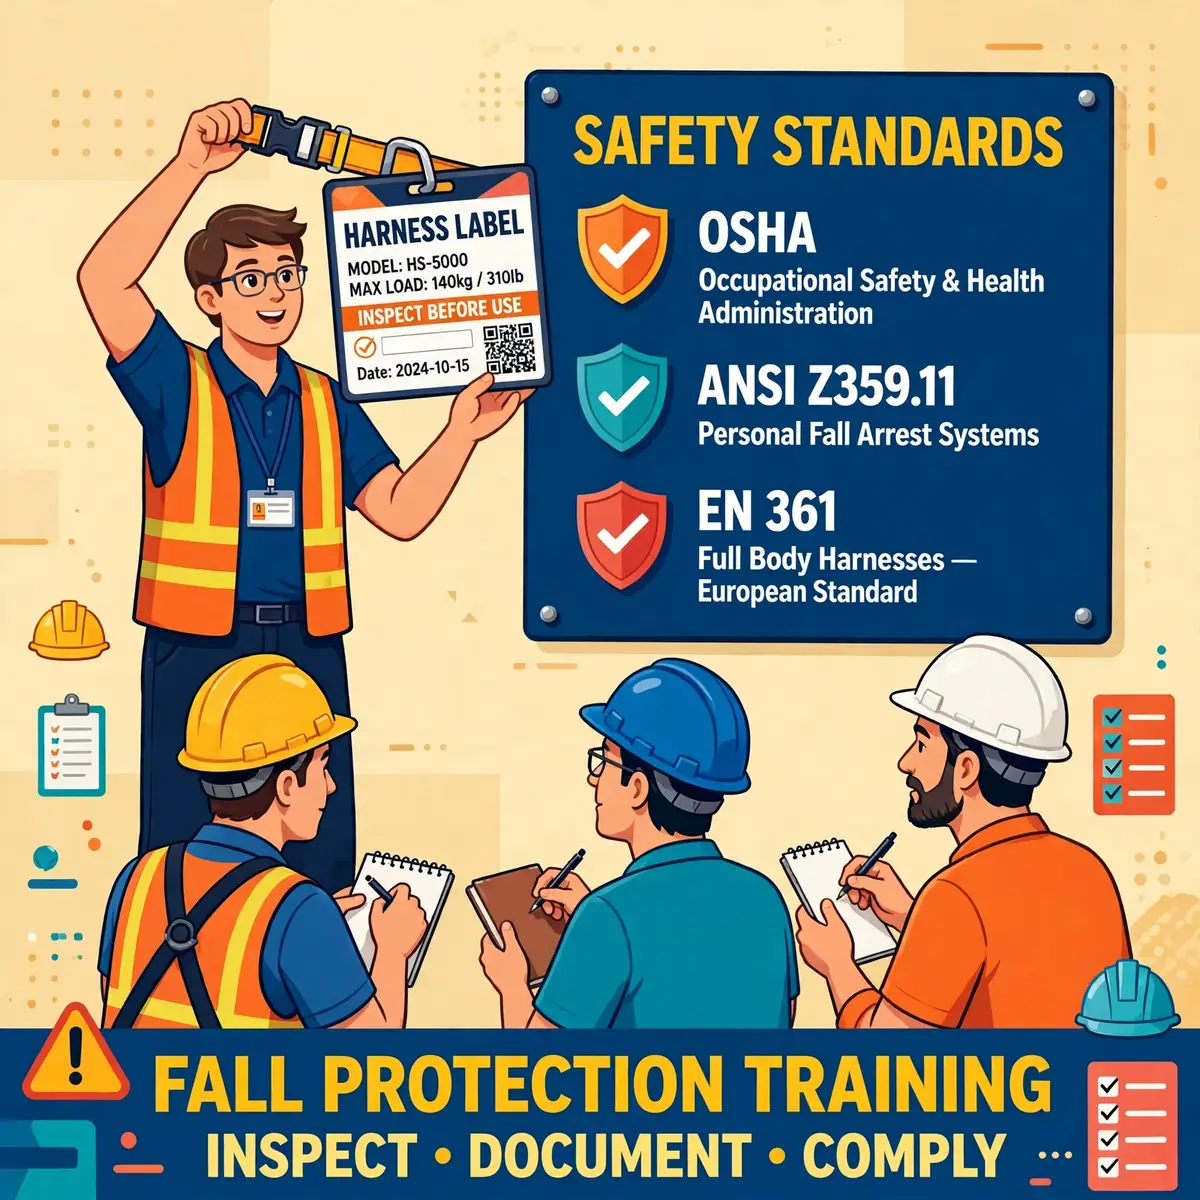
The rules for harnesses come from three places, and they do different jobs. The law sets the minimum: what must be provided, inspected, and trained. Standards describe the current state of the art that manufacturers certify against. Manufacturer instructions fill in the details for each model, from the capacity range to the cleaning method. A safe harness programme uses all three, and no one of them replaces the others.
Jurisdiction matters. A US search market does not establish US jurisdiction, and the text here attributes each requirement to its own country and document. The US rules below are federal OSHA rules. The UK rules are the Work at Height Regulations 2005. The European standards are EN standards, used in the UK and the EU, and they are not US law.
United States: the OSHA rules
In US construction work, 29 CFR 1926.502 sets the criteria for personal fall arrest systems. It requires the attachment point of the body harness to sit in the centre of the wearer's back, near shoulder level or above the head. It limits the maximum arresting force on a worker in a harness to 1,800 pounds. It also requires the system to be rigged so the worker can neither free fall more than 6 feet nor contact any lower level.
The same rule requires personal fall arrest systems to be inspected prior to each use for wear, damage and other deterioration, with defective components removed from service. Equipment subjected to impact loading must be removed at once and used again only after a competent person inspects it and finds it undamaged and suitable for reuse. In general industry, 29 CFR 1910.140 carries the same duties: inspection before use, defective equipment removed, and the dorsal D-ring as the attachment point, near shoulder level.
Great Britain and Europe: the UK rules and EN standards
Great Britain's Work at Height Regulations 2005 apply wherever a person could fall a distance liable to cause personal injury, and there is no minimum height in the Regulations. Regulation 6 sets the hierarchy, in order:
- Avoid work at height where reasonably practicable.
- Prevent falls where the work cannot be avoided.
- Minimise the distance and consequences of a fall where the risk remains.
Collective protection comes before personal protection at every step. A harness is the last resort in the hierarchy, not the first.
The European harness standards sit alongside the UK rules. EN 361 covers full-body harnesses, and only a harness meeting it may arrest a fall. EN 358 covers work positioning belts and lanyards, EN 813 covers sit harnesses for suspension, and neither of those may arrest a fall on its own. EN 355 covers energy absorbers, limiting the maximum arrest force to 6 kilonewtons for a 100-kilogram user in Europe. The HSE leaflet INDG367 gives the inspection regime for webbing and rope equipment, with pre-use checks, detailed inspection and interim inspection.
Standards for harnesses, side by side
The table below brings together the standards that matter most for harness users. The US column is the ANSI/ASSP Z359 family, which manufacturers label to. The European column is the EN family, which applies in the UK and the EU. The two families cover the same ground in different words. A harness sold in one market will usually carry only its own family's marking.
| Subject | US standard | European standard |
|---|---|---|
| Full-body harness | ANSI/ASSP Z359.11-2021 | EN 361 |
| Energy-absorbing lanyard | ANSI/ASSP Z359.13 | EN 355 |
| Self-retracting device | ANSI/ASSP Z359.14-2021 | EN 360 |
| Connectors | ANSI/ASSP Z359.12 | EN 362 |
| Work positioning | ANSI/ASSP Z359.3 | EN 358 |
| Managed fall protection programme | ANSI/ASSP Z359.2 | BS EN 365 (inspection) |
ANSI/ASSP Z359.11-2021 covers the performance, design, marking, qualification, instruction, training, test methods, inspection, use, maintenance and removal from service of full-body harnesses. Its capacity range is 130 to 310 pounds, including clothing, tools and equipment. Arc-flash work adds ASTM F887, which tests fall protection for electrical environments where arc exposure is a credible hazard. The general PPE requirements cover how employers assess, provide and maintain protective equipment as a whole.
Training: who must be trained, and in what
Equipment without training is a hazard with a label on it. Under 29 CFR 1926.503, the employer must provide a training programme for each employee who might be exposed to fall hazards, delivered by a competent person. The training must cover three things:
- The nature of the fall hazards in the work area.
- The correct procedures for erecting, maintaining, disassembling and inspecting the fall protection systems used.
- The use and operation of those systems.
Training must be practical, not a signature on a form. Workers need hands-on practice fitting a harness, connecting to an anchor, judging clearance, and inspecting their own gear. A worker who has only watched a video will not recognise a twisted strap or a bent snaphook gate on a real job.
Retraining is required when the workplace changes, the equipment changes, or the worker's knowledge or use shows a gap. The OSHA training rules cover what the training must include and how often it repeats. The hierarchy of controls explains why the harness sits last in the order of controls.
AlertA worker trained on one harness model is not automatically trained on another, so retrain whenever the equipment changes.
Common mistakes that cause harm
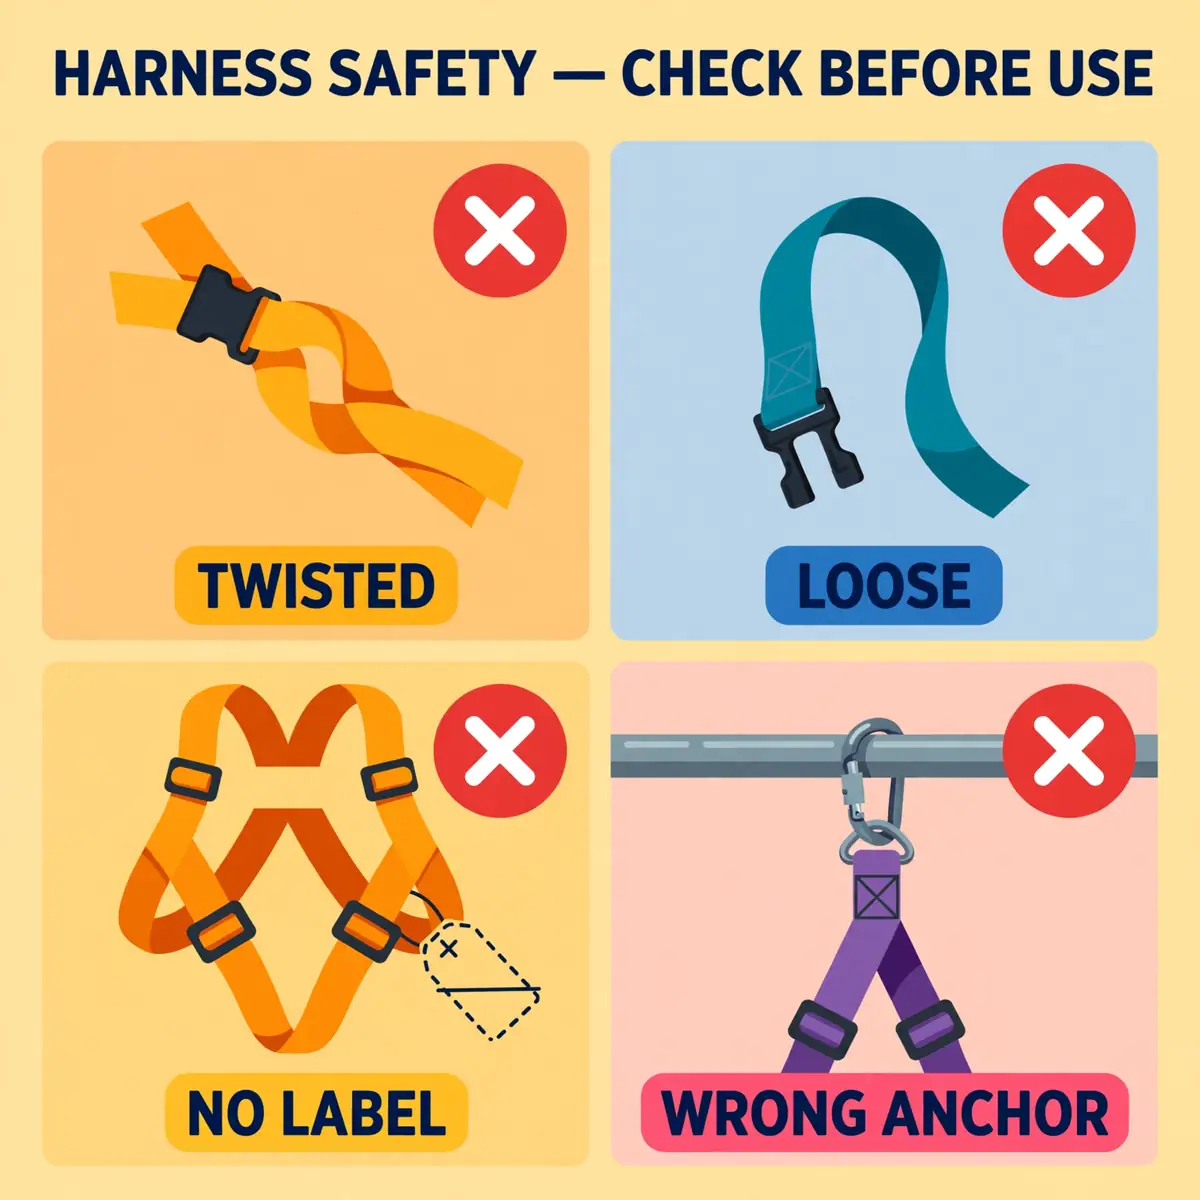
Most harness failures are not caused by missing equipment. They are caused by equipment bought but not inspected, worn but not fitted, or fitted but never connected. Each mistake below has injured workers who believed they were protected, and each one has a simple countermeasure that belongs in the daily routine.
The mistakes split into two groups: mistakes with the harness itself, and mistakes with the system around it. Harness mistakes are visible on the job and can be caught by inspection and the fit check. System mistakes are invisible until the fall happens, which is why they cause the worst outcomes. Both groups are preventable, and both are the employer's responsibility to find before the work starts.
Mistakes with the harness
The most common harness mistake is wearing it loose. A harness with slack leg straps, a chest strap at the throat, or a dorsal D-ring sitting low on the back is a loose harness. It will injure the worker during the arrest it was bought for. The second is wearing it twisted: webbing caught under a buckle loads unevenly and cuts into the body. The third is wearing a harness of the wrong type for the job. Examples are a positioning belt used for arrest, or a 1-point harness where the work needs positioning points.
Damaged equipment kept in service is the fourth mistake. A harness with a cut, broken stitching, or a bent snaphook gate all look usable at a glance. That is why the before-each-use inspection exists. Defective components must be removed from service rather than set aside for later repair. This is because later repair usually means quiet reuse. The fifth is sharing harnesses without re-adjusting them. A harness adjusted for someone else is a harness fitted for someone else.
Mistakes with the system around the harness
The most dangerous system mistake is treating the harness as the whole plan. A job that could have been guarded, restrained, or eliminated. Was given harnesses instead, has accepted the weakest control for no reason. The second is connecting to the wrong anchor. A guardrail, a vent pipe, a scaffold tube, or a hoist are not rated anchorages. The construction rule forbids attaching a personal fall arrest system to a guardrail system or to a hoist.
The third is skipping the clearance check. A 6-foot lanyard on a low roof, a foot-level anchor, or a swing-fall path each turn a compliant harness into one that cannot stop the worker before the lower level. The fourth is having no rescue plan, so the suspended worker waits with no one able to bring them down. The fifth is training that never happened, or happened once and was never refreshed when the equipment changed.
- Loose harness: slack straps let the body slide and load the groin during arrest.
- Twisted webbing: a strap caught under a buckle loads unevenly and cuts in.
- Wrong type: a positioning belt used for arrest, or a harness without the needed points.
- Wrong anchor: guardrails, pipes and hoists are not rated anchorages.
- No clearance check: the system cannot stop the worker before the lower level.
- No rescue plan: the suspended worker waits with no one able to bring them down.
- Stale training: new equipment or a new site, with training from a different job.
Each mistake has a simple countermeasure, and each countermeasure belongs in the daily routine:
- Inspect before use.
- Fit the harness and check the five points.
- Check the anchor.
- Check the clearance.
- Confirm the rescue plan.
A supervisor who checks those five points at the start of the shift will catch most of the failures that cause harm. The checks take minutes, and they are the difference between a system and a costume.
Frequently Asked Questions
What D-ring do I use for fall arrest?
Use the dorsal D-ring, centred between the shoulder blades, for fall arrest in almost every case. The sternal D-ring on the chest may serve for fall arrest only where free fall is tightly limited, such as in a fixed ladder climbing system. Side D-rings at the hips are for work positioning only and must never be used to arrest a fall.
How often should I inspect my harness?
Inspect the harness before every use, and remove any defective component from service at once. On top of that, a competent person must carry out a detailed, documented inspection. The schedule sits in the manufacturer instructions, commonly at least every 12 months. Interim inspections cover conditions that cause rapid deterioration.
How long does a fall protection harness last?
There is no universal expiry date for a harness. Many manufacturers state a maximum service life of about 10 years from manufacture. The manual for the model is the authority. Retire a harness sooner when it fails inspection, has arrested a fall, has unreadable labels, or has reached the end of its stated service life.
Can I wear a harness that has arrested a fall?
No, not until a competent person has inspected it and found it undamaged and suitable for reuse. Equipment subjected to impact loading must be removed from service immediately. It must stay out of service until that inspection is done. In practice, most harnesses that have arrested a fall are retired.
What is the difference between a full-body harness and a body belt?
A full-body harness spreads the arresting force across the thighs, pelvis, waist, chest and shoulders. It is the only body support that may arrest a fall. A body belt concentrates the force on the waist. It has been banned from fall arrest in US construction since 1 January 1998. Body belts remain acceptable only in positioning systems, where no fall is arrested.
How tight should a harness be?
Snug, but not tight. Leg straps must admit a flat hand but not a closed fist. The chest strap must sit across the sternum, tight enough to keep the shoulder straps from slipping off. Webbing must lie flat with no twists, and strap tails must be stowed in their keepers. If the straps cut off circulation or restrict breathing, the harness is too tight.
Sources
- OSHA — 29 CFR 1910.140, Personal fall protection systems
- OSHA — 29 CFR 1926.502, Fall protection systems criteria and practices
- OSHA — 29 CFR 1926.503, Training requirements
- OSHA — Clarification on inspection of personal fall protection systems (2003 interpretation letter)
- OSHA — Safety and Health Information Bulletin SHIB 03-24-2004, Suspension trauma / orthostatic intolerance
- ANSI — ANSI/ASSP Z359.11-2021: Full Body Harnesses Safety Requirements
- HSE — INDG367, Inspecting fall arrest equipment made from webbing or rope
- UK legislation — Work at Height Regulations 2005, Regulation 6